Hotel Mario - Level Gimmicks And Guaranteed Items
Every hotel in Hotel Mario has a gimmick associated with it. These gimmicks can be split into two categories:
- Hotel traps: Hazards, obstructions, and other related obstacles that impede the player AND can be permanently disabled through performing certain actions, such as entering a door or defeating an enemy. Most of these traps have an associated cutscene (and refill the timer upon their discovery), though two do not.
- Warp pipes: These warp Mario to a later hotel and stage, and are always located at a fixed door within a hotel. Every level between a warp pipe's entrance and exit will be unlocked upon its discovery. Upon finding a warp pipe, a cutscene plays where Mario tumbles through it. (In an eerily prescient choice of SFX, the stock sound used for the warp pipe is the same one used for Super Mario 64's pipes.)
In addition, while doing research for this page, I discovered (or re-discovered) guaranteed items that are instantly awarded to Mario and Luigi if they enter a specific hotel door or touch a specific area. These items usually follow a item chain of succession, going from Mushrooms to Fire Flowers to even Toads/1-ups.
I have not been able to find a comprehensive list of either the guaranteed items or how, exactly, the hotel traps work and are deactivated. So...
To rectify this issue, I have created this page to list everything there is to know about the gimmicks and guaranteed items of Hotel Mario!
Sections:
Morton's WoodDoor-Hysteria Hotel -- Roy's HardBrick Hotel -- Larry's Chillton Hotel -- Lemmy's High-ate Regency Hotel -- Ludwig's Thump Castle Hotel -- Wendy's Blitz Snarlton Hotel -- Bowser's Seizures Palace
Morton's WoodDoor-Hysteria Hotel
Gimmick: Warp Pipe
Hotel Mario's first warp pipe can be found in Morton's hotel. On Stage 6, enter the rightmost door on the top floor, and Mario/Luigi will be warped to Stage 3 of Larry's Chillton Hotel.
Quick and simple.
Guaranteed Items
Stage 5: Middle door of second floor (1-up) |
Stage 7: Middle door of third floor (Starman) |
Roy's HardBrick Hotel
Gimmick: Blackouts
There is a room in Roy's hotel dedicated to toasting dozens of slices of bread. It drains from the hotel's power and causes it to frequently experience blackouts.
Blackouts are on a cycle that last a random amount of time; from what I've experienced, they show up every 9 to 11 seconds (18 to 22 ticks of the in-game timer). Fortunately, they are brief and last around three seconds (six ticks on the timer).
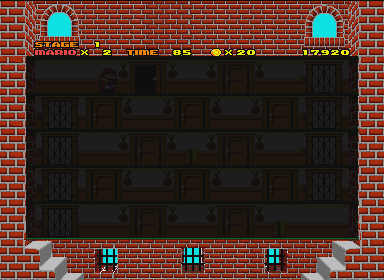
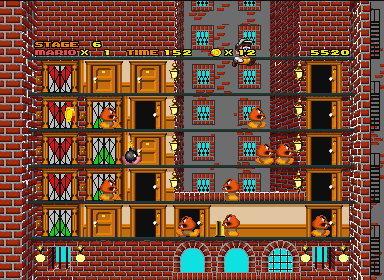
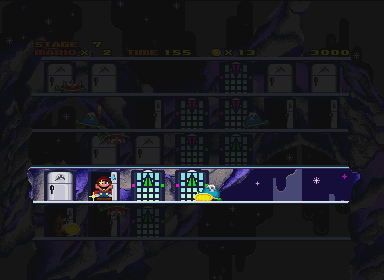
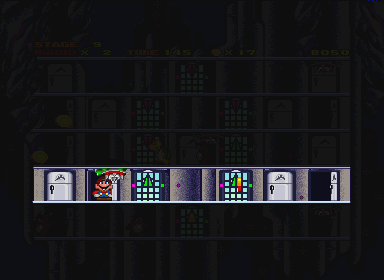
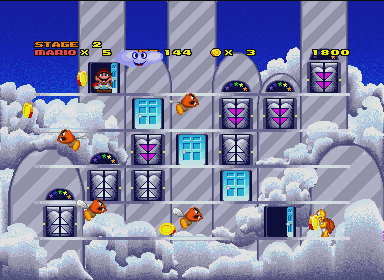
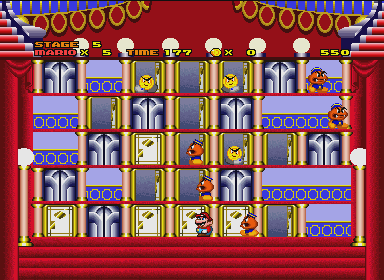
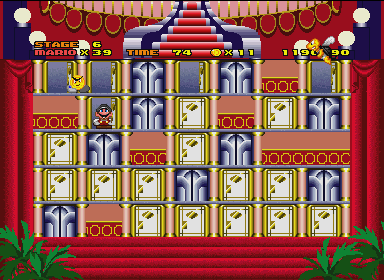
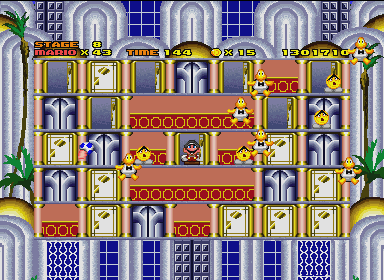
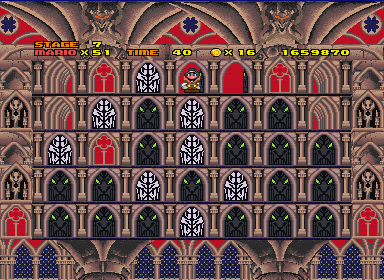
They start with a "leadup" consisting of the hotel's lights varying in brightness (picture 1), which lasts around two seconds (four ticks). This is followed by a second (two ticks) of total darkness (picture 2), after which the brightness returns to normal. There are brick rooms within Roy's hotel that have windows and illuminate at least a three-block-wide area - these never go dark when the power goes out.

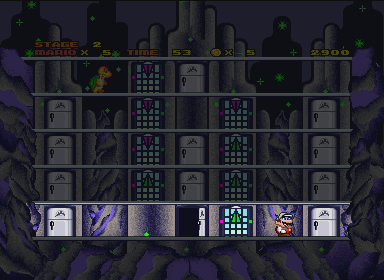
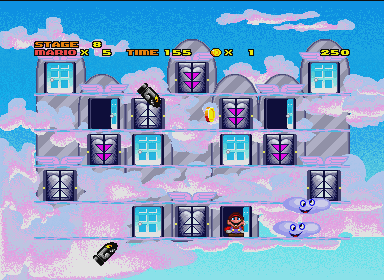
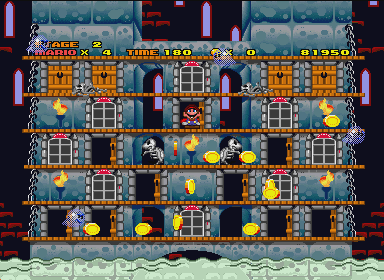
To deal with this gimmick, you must find the door that leads to the "Toaster Room" and unplug the toasters. Right before a specific blackout happens, a closed door on an "initial" floor will begin to emit sparks (isolated in picture 3, in-game in picture 4) and start a timer. The player must enter the door before the timer runs out to enter the Toaster Room.
The door chosen will change depending on the status of the intial floor. Usually, the left-most door will house the Toaster Room, though if it's currently open, then the next closed door on the floor is picked. If all doors are open on the floor, then it'll be moved to a closed door on the floor below it (wrapping around to the top if it has to).
The following stages can spawn the Toaster Room:
- Stage 4: Third blackout, on the third floor.
- Stage 5:
- Third blackout, on the first floor.
- Sixth blackout, on the third floor.
- Stage 6:
- Third blackout, on the second floor.
- Sixth blackout, on the fifth floor.
- Stage 7:
- One of the first two chances is chosen at random, though on rare occasions both can happen:
- Second blackout, on the third floor.
- Third blackout, on the first floor.
- Fifth blackout, on the first floor.
- Seventh blackout, on the first floor.
- Stage 8:
- Second blackout, on the first floor.
- Fourth blackout, on the first floor.
- Seventh blackout, on the fifth floor.
- Stage 9:
- Second blackout, on the second floor.
- Fourth blackout, on the second floor.
- Fifth blackout, on the first floor.
- Seventh blackout, on the fifth floor.
- Stage 10 (Roy's Rowdy Rooftop):
- Second blackout, on the fourth floor.
- Fourth blackout, on the first floor.
- Fifth blackout, on the second floor.
- Seventh blackout, on the fifth floor.
Guaranteed Items
Stage 2: Left door of fifth floor (1-up) |
Stage 5: Right door of second floor (Mushroom/Fire Flower/Toad) |
Stage 6: Jump behind coin counter (Fire Flower) |

Stage 8: Right door of second floor (Mushroom/Fire Flower/Toad) |
Stage 10 (Roy's Rowdy Rooftop): Second leftmost door of fifth floor (1-up) |
|
Larry's Chillton Hotel
Gimmick 1: Warp Pipe
Larry's hotel has both types of gimmick - the only level in Hotel Mario to do this. Let's start with the Warp Pipe first as it's easier to explain.
On Stage 5, enter the lone door on the topmost floor, and Mario/Luigi will be warped to Stage 8 of Wendy's Blitz Snarlton Hotel. Now, for the darkness gimmick.
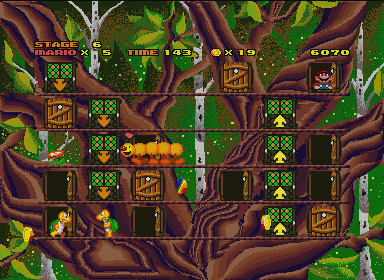
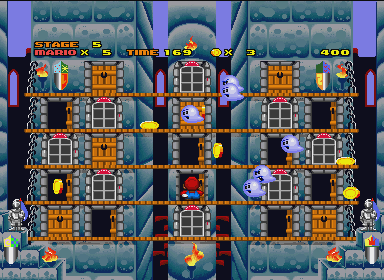
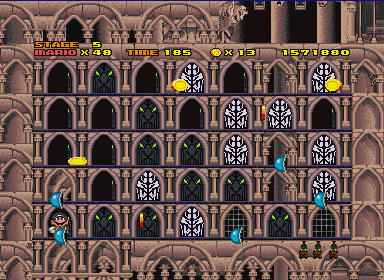
Gimmick 2: Darkness
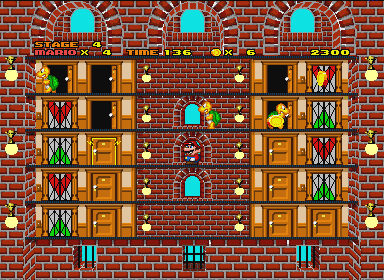
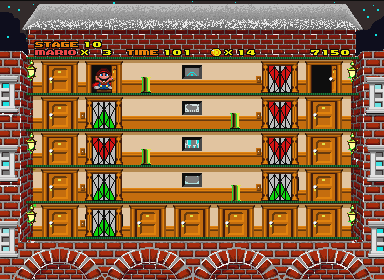
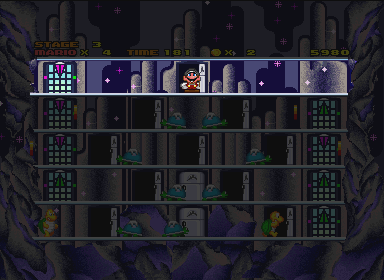
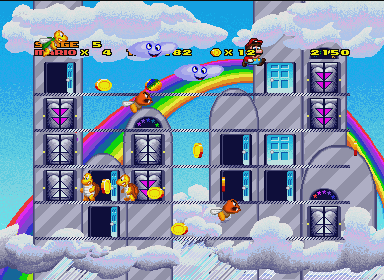
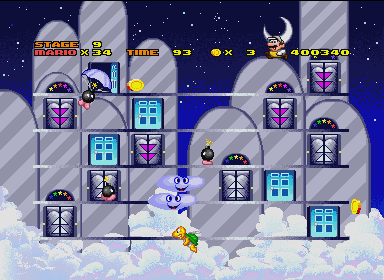
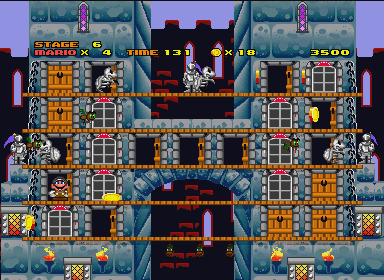
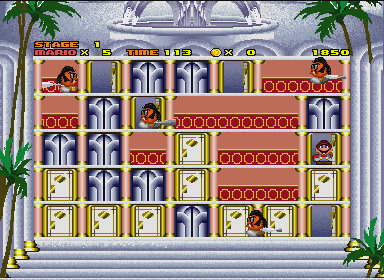
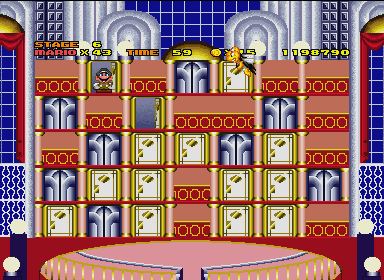
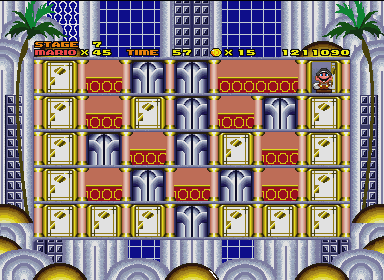
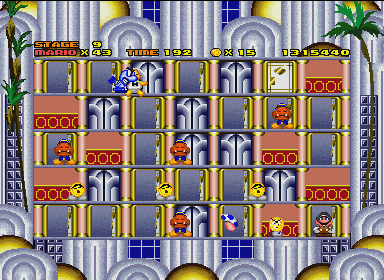
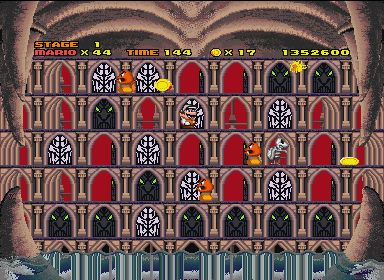
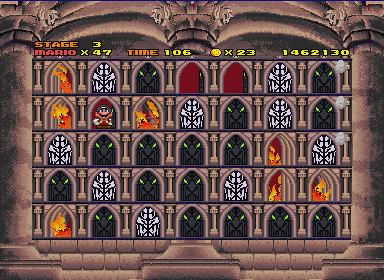
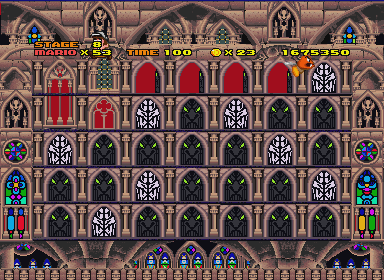
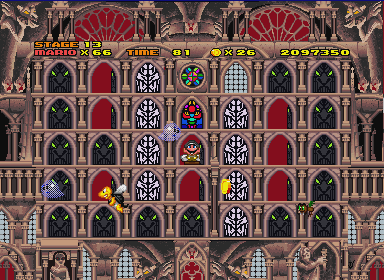
Fortunately, how it works is rather simple. The stage's floors are shrouded in darkness with the exception of the one that Mario/Luigi is currently on (as shown in picture 1). The stages get progressively darker until Stage 10, at which point they are nearly pitch black. This makes it hard to tell what enemies and obstacles are directly above the player when they jump. Only death, beating the stage, and acquiring a candle from a specific Koopa will brighten everything up. Speaking of...

The way to permanently lighten this darkness is to find the "Candle Koopa", a green-shelled Koopa with glowing red eyes (isolated in picture 2, in-game in picture 3). The player must defeat him and take his candle before it vanishes. He will always enter the level from a specific floor's door and pace around for a while before leaving through a designated "exit". If Mario/Luigi is blocking the Candle Koopa's entry door, he will never spawn, and if they're blocking the exit door, the Candle Koopa will simply choose a neighboring door. Fortunately, the Candle Koopa is nice enough to both close the door when leaving (and leave it closed upon entry!) and never open any closed doors.
The Candle Koopa will appear in these stages:
- Stage 2: When the timer hits 80, on the fifth floor's lone door.
- Stage 4: When the timer hits 105; enters from second floor's right door and leaves through left door.
- Stage 6: When the timer hits 140; enters from fifth floor's rightmost door and leaves through center door.
- Stage 8: When the timer hits 130; enters from fourth floor's right door and leaves through left door.
- Stage 9: When the timer hits 160; enters from third floor's center door and leaves through right door.
Guaranteed Items
|
Stage 1: Leftmost door of fifth floor (Mushroom/Fire Flower/Toad) |
Stage 3: Lone door of fifth floor (Fire Flower) |
Stage 4: Jump behind score counter (Mushroom/Fire Flower/Toad) |
Stage 6: Left door of first floor (Mushroom/Fire Flower/Toad) |
Stage 7: Right door of second floor (Starman) |
Stage 9: Second-left door of second floor (Mushroom/Fire Flower/Toad) |

Stage 10 (Larry's Scary Lair): Rightmost door of first floor (instantly defeats Larry) |
|
Lemmy's High-ate Regency Hotel
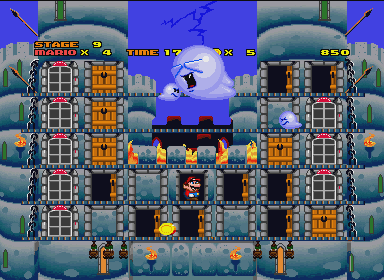
Gimmick: Clouds
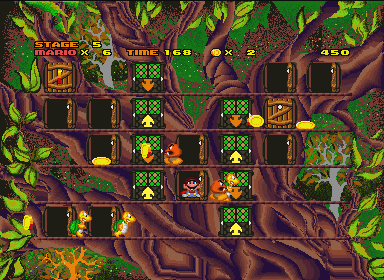
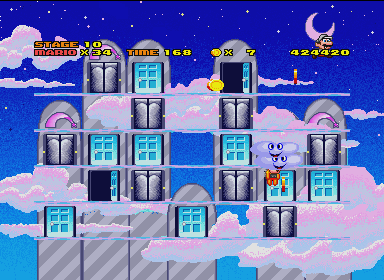
Located high in the Mushroom Kingdom's sky, it should come as no surprise that there are clouds of varying sizes blocking the view of Lemmy's hotel.
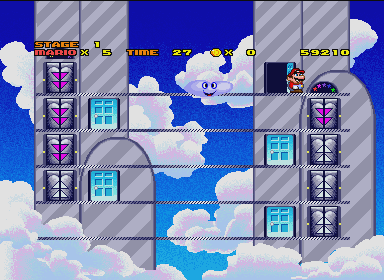
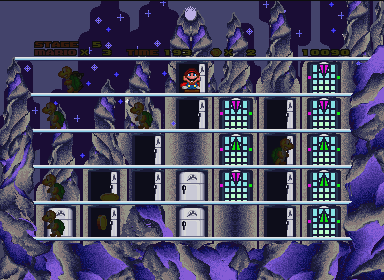
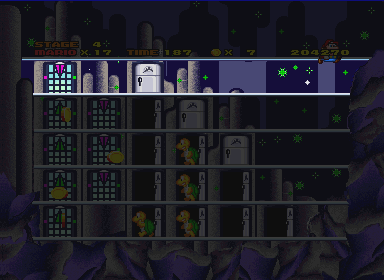
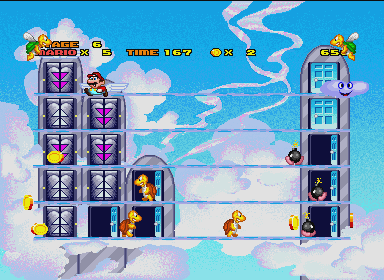
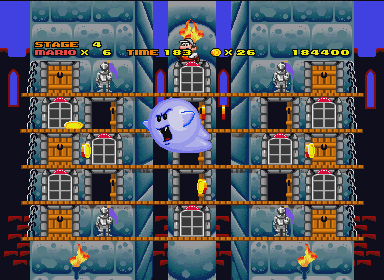
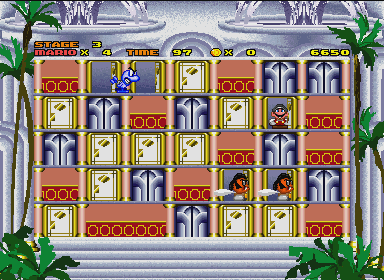
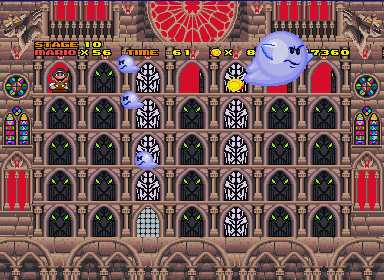
Sure enough, clouds will block the player from seeing the goings-on inside Lemmy's hotel (seen in picture 1). They will follow Mario/Luigi across floors and float around them once it's close enough, though on rare occasions they'll wander off for a handful of seconds. Stages 1 to 4 have only one cloud while Stages 5 to 10 have two clouds. To get rid of them, you'll need to blow them away using a giant fan.

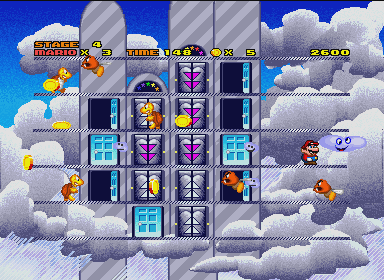
To do this, you'll need to find the "Fan Room" within one of the levels, which acts as a slightly more complex version of the Toaster Room from Roy's hotel. Once the timer hits a specific time, three open/closed doors are randomly chosen to have a little cloud appear, rise, and disappear on their right sides (isolated in picture 2, in-game in picture 3). In total, one "smiling" cloud and two "neutral" clouds are spawned. The smiling cloud indicates where the Fan Room has actually spawned, while the neutral clouds are just decoys. Once the clouds appear, the player has a limited amount of time to find the Fan Room.
It is entirely possible for Mario/Luigi to automatically enter the Fan Room if they happen to be already standing in the chosen doorway.
The following stages can spawn the Fan Room:
- Stage 4: When the timer hits 150 and 90.
- Stage 6: When the timer hits 160 and 100.
- Stage 8: When the timer hits 170, 110, and 80.
- Stage 9: When the timer hits 180, 120, and 90.
- Stage 10: When the timer hits 190, 130, and 100.
Guaranteed Items
Stage 2: Lone door on fifth floor (Mushroom/Fire Flower/Toad) |
Stage 5: Jump behind coin counter (Mushroom/Fire Flower/Toad) |
Stage 6: Jump near elevator wings while on fourth floor (Mushroom/Fire Flower/Toad) |
Stage 7: Jump behind middle of score counter (up to two 1-ups, one per jump) |
Stage 8: Right door on first floor (Mushroom/Fire Flower/Toad) |
Stage 9: Jump in front of moon (up to two 1-ups, one per jump) |
Stage 10 (Lemmy's Sky-Hideout): Jump behind middle of score counter (instantly defeats Lemmy) |
|
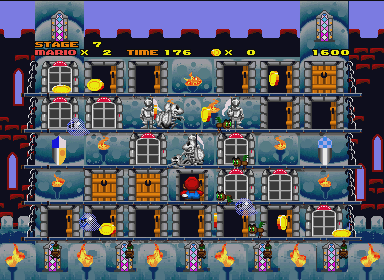
Ludwig's Thump Castle Hotel
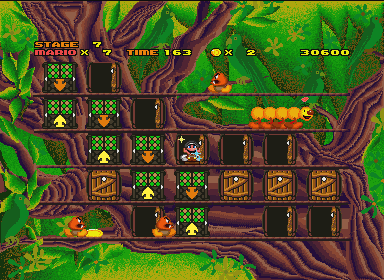
Gimmick: Vanishing Doors
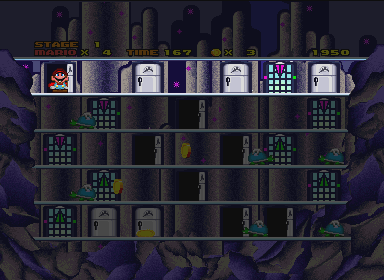
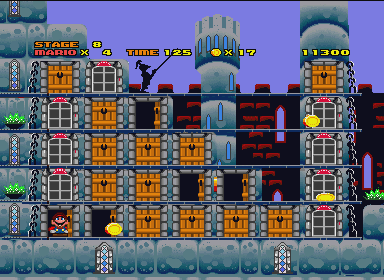
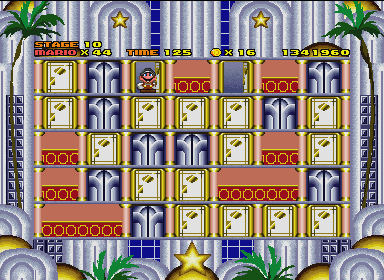
Someone is messing around with the doors in Ludwig's hotel, turning them invisible from time-to-time. While they're in this state, neither the Mario Bros. nor the enemies can interact with them.
At set times throughout the hotel's stages, a specific number of doors will turn invisible for at least 19 timer ticks (9.5 seconds). This period increases by a single timer tick every stage past Stage 1 - therefore, Stage 10's invisiblity periods will last 28 timer ticks (14 seconds). If Mario/Luigi happen to be right next to an invisible door - in an approximately three-door-wide radius - the door will remain invisible after its period ends until either the player moves away or the time runs out.
The doors are determined by the player's current position and floor, but ultimately it is random which doors go invisible. Both types of door are affected by the invisibility, though for Stage 1, the invisibility only happens to open doors.
Most stages have unique values for the amount of invisible doors and when they turn invisible. They are:
- Stage 1: When the timer hits 130. One door will disappear for 19 ticks (9.5 seconds).
- Stage 2: When the timer hits 140 and 80. Two doors will disappear for 20 ticks (10 seconds).
- Stage 3: When the timer hits 140 and 80. Two doors will disappear for 21 ticks (10.5 seconds).
- Stage 4: When the timer hits 140 and 80. Two doors will disappear for 22 ticks (11 seconds).
- Stage 5: When the timer hits 160, 110, and 70. Three doors will disappear for 23 ticks (11.5 seconds).
- Stage 6: When the timer hits 165, 110, and 65. Three doors will disappear for 24 ticks (12 seconds).
- Stage 7: When the timer hits 170, 110, and 60. Three doors will disappear for 25 ticks (12.5 seconds).
- Stage 8: When the timer hits 175, 110, and 55. Four doors will disappear for 26 ticks (13 seconds).
- Stage 9: When the timer hits 180, 110, and 50. Four doors will disappear for 27 ticks (13.5 seconds).
- Stage 10: When the timer hits 185, 110, and 50. Five doors will disappear for 28 ticks (14 seconds).
To get these doors to stop vanishing, you'll need to find the bottle of Bowser's Ghost Cologne within the hotel. The cologne is hidden behind a door that is invisible unless Mario/Luigi stands in front of it and presses Button Two, like they would to a regular door.
Fortunately, all three instances of the "Cologne Room" are in the exact same location across three separate stages, and don't disappear/change with the timer.
It can be found on Stages 5, 7, and 9, in the center of their second floors.
Guaranteed Items
Stage 1: Leftmost door on first floor (Fire Flower + two 1-ups) |
Stage 2: Lone door on fourth floor (Mushroom/Fire Flower/Toad) |
Stage 4: Jump above fifth floor elevator (Fire Flower) |
Stage 6: Left door on second floor (Mushroom/Fire Flower/Toad) |
Stage 8: Leftmost door on first floor (instantly defeats enemies on-screen) |
|
Wendy's Blitz Snarlton Hotel
NOTE: For both this hotel and Bowser's hotel, stages are under the format X-Y, where X is the stage number and Y is the first or second half of the stage. (So, 7-1 would be the first half of Stage 7.)
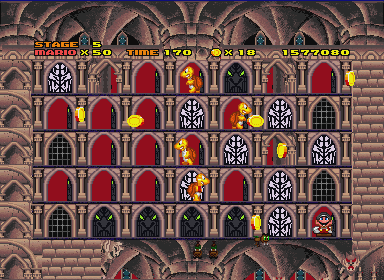
Gimmick: Wendy's Pennies
Wendy's hotel weaponizes one of Mario's favorite collectibles by turning it into a deceiving enemy!

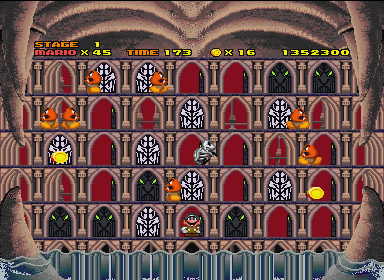
Pennies (isolated in picture 1, in-game in picture 2) replace any coin(s) that initially appear on the stage or spawn from opening a door. They have an initial coin "disguise" that lasts for one bounce, after which they reveal their true form. These currency-based creeps have a high movement speed and will turn to face Mario/Luigi whenever they exit a door or elevator - as a result, they are quite persistent and annoying! Pennies first appear on Stage 2-2, and only when opening the top-most door.
While Wendy's Pennies are very annoying, there are a couple of quirks that lessen their awfulness. Firstly, they do not replace every coin on a stage. Any door that gives coins to Mario/Luigi when entered will always give them real coins. Secondly, if the player is quick enough, Pennies can be collected just like coins if they are touched before they fully transform (indicated by their face appearing). It's a bit hard to pull off, especially during the tougher levels of Wendy's hotel.
To stop these cantankerous currencies, you need to find the "Piggy Bank Room" within the hotel and free the real coins. At specific intervals throughout certain stages, a cash register sound will play to indicate that the Piggy Bank Room has spawned. The player must find the doorway it spawned in before time runs out. Unlike Roy and Lemmy's gimmicks, there is no visual indicator that tells where the Piggy Bank Room is.
Fortunately for you (and the person writing this page), the Piggy Bank Room spawns in a specific room for every interval, and it never changes even if the door has already been opened. After the Piggy Bank Room is found, every Penny on the current stage will automatically turn into a coin.
The following stages will spawn the Piggy Bank Room:
- Stage 5-1:
- When the timer hits 180, in the central door on the first floor.
- When the timer hits 120, in the leftmost door on the third floor.
- When the timer hits 60, in the central door on the fifth floor.
- Stage 5-2:
- When the timer hits 180, in the second-from-left door on the fifth floor.
- When the timer hits 120, in the second-from-left door on the fifth floor.
- When the timer hits 60, in the leftmost door on the first floor.
- Stage 7-1:
- When the timer hits 170, in the third-from-left door on the first floor.
- When the timer hits 110, in the third-from-left door on the first floor.
- When the timer hits 50, in the third-from-right door on the first floor.
- Stage 7-2:
- When the timer hits 170, in the rightmost door on the third floor.
- When the timer hits 110, in the rightmost door on the fifth floor.
- When the timer hits 50, in the rightmost door on the third floor.
- Stage 9-1:
- When the timer hits 160, in the center door on the second floor.
- When the timer hits 100, in the rightmost door on the fifth floor.
- When the timer hits 40, in the center door on the second floor.
- Stage 9-2:
- When the timer hits 160, in the center door on the first floor.
- When the timer hits 100, in the center door on the fifth floor.
- When the timer hits 40, in the center door on the fifth floor.
Guaranteed Items
Stage 1-1: Rightmost door on third floor (Mushroom/Fire Flower/Toad) |
Stage 3-1: Rightmost door on fourth floor (Fire Flower) |
Stage 4-2: Jump behind "STAGE/MARIO" text (Fire Flower) |
Stage 6-1: Jump behind "STAGE/MARIO" text (Fire Flower/Toad) |
Stage 6-2: Left door on fifth floor (four 1-ups) |
Stage 7-1: Right door on fifth floor (Mushroom/Fire Flower/Toad x2) |
Stage 8-1: Rightmost door on first floor (Starman) |
Stage 8-2: Center door on third floor (instantly defeats enemies on-screen) |
Stage 9-1: Rightmost door on first floor (instantly defeats enemies on-screen) |
Stage 10-1 (Wendy's Sweet Suite 1): Center door on fifth floor (Mushroom/Fire Flower/Toad) |
Stage 10-2 (Wendy's Sweet Suite 2): Rightmost door on fifth floor (Mushroom/Fire Flower/Toad x2) |
|
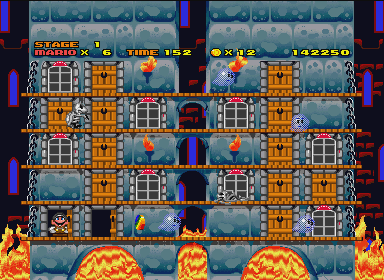
Bowser's Seizures Palace
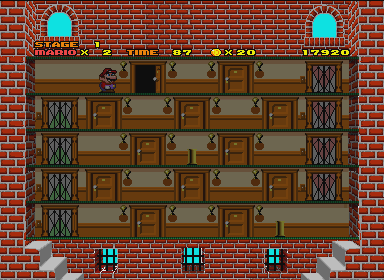
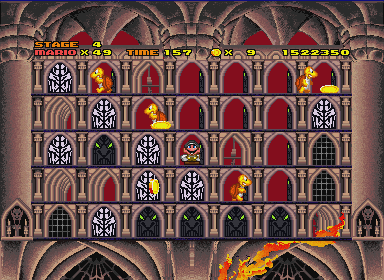
Gimmick: Fireballs
The last gimmick in Hotel Mario is a bit odd, at least in terms of mechanics.

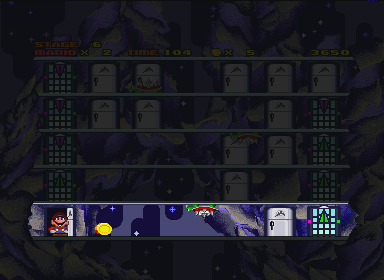
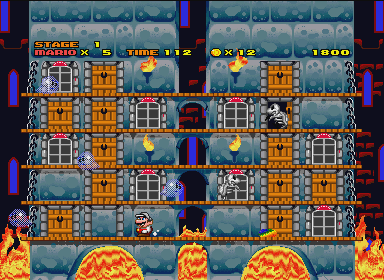
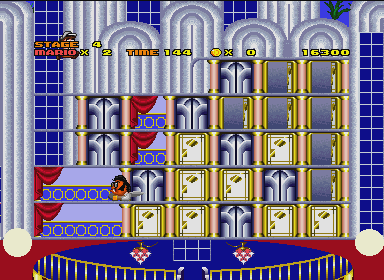
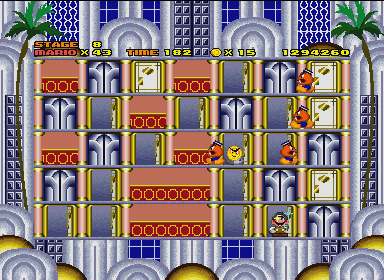
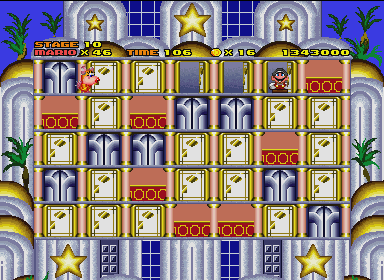
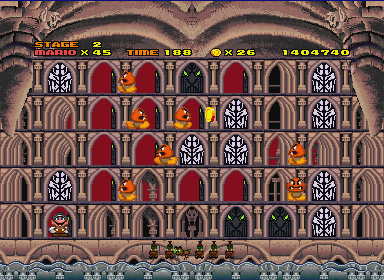
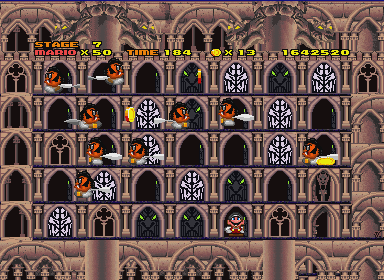
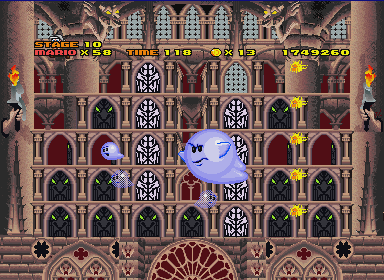
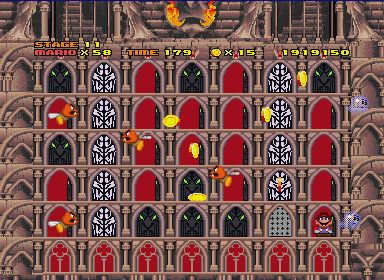
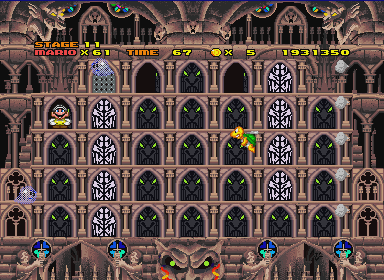
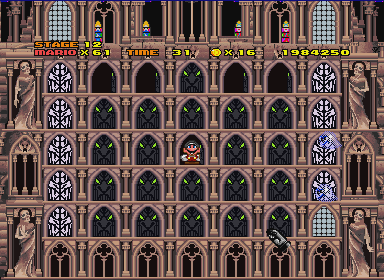
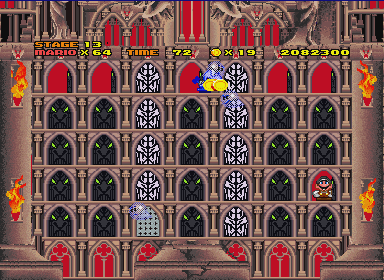
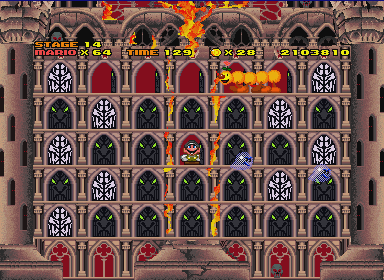
Bowser's hotel is home to fireballs (isolated in picture 1, in-game in picture 2) that periodically fly across the floors of its stages. Initially, only the topmost floor will spawn fireballs, but by Stage 5 every floor will spawn one. Fireballs will either appear from the left or the right side of the screen, depending on which one is furthest from Mario/Luigi. If the player is in the center of the stage, then the fireballs will always come in from the right.
When fireballs are spawned is decided at random; from what I've experienced in-game, this spawning interval can last anywhere from 20 ticks (10 seconds) to 30 ticks (15 seconds). Their arrival is heralded by a puff of smoke and its associated "ffsht!" sound, which lasts for two ticks (1 second). The fireballs will then appear and take 5 ticks (2.5 seconds) to cross the stage before disappearing.
Fireballs are positioned quite a bit off the floor's actual floor. As a result, it's hard (but not impossible) to jump over them, and you'll likely have to either duck under them or hide in a door/elevator. Fortunately, this gimmick has a humongous weakness. If you are playing as Fire Mario or Fire Luigi, you can disable the entire gimmick - including every fireball that can spawn from it, from every stage in the hotel - by throwing a single fireball at any of the spawned fireballs. You'll need to perform a tricky jumping shot to do this, and you'll receive no points, but it's very much worth the hassle.
Here's a handy table showing what stages in Bowser's hotel can spawn fireballs, as well as the floors that do:
| Stage(s) | Floors with Fireballs |
|---|---|
| 1 | Fifth |
| 2 | Fourth/Fifth |
| 3 | Third/Fourth/Fifth |
| 4 | Second/Third/Fourth/Fifth |
| 5 to 14 | All five |
| 15 | None |
Guaranteed Items
Stage 1-1: Center door on first floor (Mushroom/Fire Flower/Toad) |
Stage 2-1: Leftmost door on first floor (Mushroom/Fire Flower/Toad) |
Stage 3-1: Leftmost door on fourth floor (Fire Flower/Toad) |
Stage 4-2: Center door on third floor (Mushroom/Fire Flower/Toad) |
Stage 5-1: Leftmost door on first floor (instantly defeats enemies on-screen) |
Stage 5-2: Rightmost door on first floor (two 1-ups) |
Stage 7-1: Rightmost door on first floor (Mushroom/Fire Flower/Toad) |
Stage 7-2: Left door on fifth floor (Fire Flower/Toad) |
Stage 8-2: Jump behind lives counter (Mushroom/Fire Flower/Toad) |

Stage 9-1: Center door on second floor (Mushroom/Fire Flower/Toad x2) |
Stage 10-1: Leftmost door on fifth floor (Mushroom/Fire Flower/Toad) |
Stage 10-2: Jump behind "STAGE/MARIO" text (Mushroom/Fire Flower/Toad) |
Stage 11-1: Rightmost door on first floor (Mushroom/Fire Flower/Toad) |
Stage 11-2: Leftmost door on fourth floor (Fire Flower/Toad) |
Stage 12-1: Center door on third floor (Starman) |
Stage 13-1: Rightmost door on second floor (Fire Flower/Toad) |
Stage 13-2: Center door on third floor (Mushroom/Fire Flower/Toad x3) |
Stage 14-1: Center door on third floor (Mushroom/Fire Flower/Toad x3) |
Return to top
Last updated: March 25th, 2026.