Zelda: The Wand of Gamelon - Character Info
Here is a listing of every character you can meet in Zelda: The Wand of Gamelon.
This includes what they do in-game, as well as sourced facts such as where they're named and who voiced them.
Categories:
Main Characters -- Ganon's Minions -- NPCs
Main Characters
Princess Zelda

Named in: In-game cutscenes
Voiced by: Bonnie Jean Wilbur (confirmed in TWoG credits)
This is the character you play as in Zelda: The Wand of Gamelon. Zelda is worried about her father, King Harkinian, heading off to Gamelon to assist against an invasion by Ganon's forces. After a month passes with no word from the King, she sends Link off to Gamelon to find Harkinian, but he goes missing too. Some time passes before Zelda decides to venture off to Gamelon, assisted by her nurse Impa and the Triforce of Wisdom. In the end, she learns of Duke Onkled's treachery, saves Gamelon from Ganon and his allies, and frees both her father and Link.
Zelda is polite and has a sense of humor, but isn't afraid to fight when the going gets tough. She only shows annoyance (and even pitilessness) to characters she doesn't like such as Hektan, Lady Alma, or Duke Onkled.
King Harkinian

Named in: TWoG Manual
Requests?: Yes - his freedom from Ganon
Rewards?: A feast
In the intro, King Harkinian hears of Ganon's invasion of Gamelon and decides to sail off to help Duke Onkled. Zelda is worried, but the King assures his daughter that he'll take the Triforce of Courage for protection, and also requests her to send Link if he hasn't responded in a month. Impa also predicts that the King will safely return from his Gamelon excursion. A month passes with no word, and after sending Link to Gamelon with similar results, Zelda sets off to find the missing duo.
Throughout the game, Zelda and Impa learn what happened to the King. In Sakado, they find out that he was captured, and in Dodomai Palace, they learn of Lord Kiro's presence and how Duke Onkled was the one who betrayed them. After defeating Ganon in Reesong Palace, Zelda is able to free her imprisoned father. Harkinian sentences Duke Onkled to scrub all of Hyrule's floors and, after Link is rescued from Lady Alma's mirror, laughs with his daughter before partaking in a feast.
Link

Named in: In-game cutscenes
Voiced by: Jeff Rath (confirmed in TFoE credits)
Requests?: Yes - his freedom from Lady Alma's mirror
Rewards?: Not really?
Link is initially seen conversing with King Harkinian about how hungry he is. After Harkinian goes missing, Link assures Zelda that Ganon is no match for the King, and is then sent off to find her missing father. He disappears, too, instigating Zelda's adventures in Gamelon. Throughout the game, Zelda learns more about what happened to Link.
In Sakado, she learns that he was in a "terrible fight" with an unclear outcome. After freeing Harbanno and visiting his store, the baker casually mentions Link's hunger, implying that he might've met him at one point. Once Zelda frees Lady Alma, she divulges that she met Link and had him trade his Canteen for a kiss. This is the last mention of Link until the ending of the game.
During the ending, Zelda loudly wonders about what happened to Link, right in front of Lady Alma's face. After Alma brushes him off as "a bore", Zelda chucks Alma's mirror into a wall, smashing it and causing Link to materialize out of thin air. He has no recollection about what happened to him, and it's made worse by Zelda stating that nothing happened.
Impa

Named in: In-game cutscenes
Impa is the keeper of the Triforce of Wisdom and acts as both Zelda's nurse and guide throughout her adventure. She is first seen using the Triforce to assure Zelda that her father, King Harkinian, will return from his mission in Gamelon. Impa later assures Zelda that her father is alright after he's not heard from. However, once Link goes missing, Zelda heads to Gamelon with Impa and the Triforce alongside her. Throughout Gamelon, Impa meets up with Zelda to tell her about Ganon's minions as well as what happened to Link and the King.
According to the game's manual, Impa transports Zelda to the various areas of Gamelon, and saves her whenever she runs out of lives.
Zelda: The Wand of Gamelon is the first game in the series to have Impa appear in the game itself instead of in the manual. Furthermore, it's the first Zelda game to have her wear blue clothing; the previous Zelda games and the Valiant comics had her in red.
Ganon

Named in: In-game cutscenes
Voiced by: Mark Berry (confirmed in YouTube comment)
Weakness: Wand of Gamelon
Drops: Key to Harkinian's prison
Ganon is the bombastic main villain of Zelda: The Wand of Gamelon, having taken over Gamelon with his minions and being responsible for the capturing of King Harkinian and Link. Ganon is first seen in a vision Impa shares to Zelda outside Dodomai Palace - there, he imprisons the King and, after Lord Kiro tries to intervene, has Hektan keep "the runt" as his prisoner. He isn't seen until Zelda enters his tower within Reesong Palace.
The bright light eminating from Zelda's lantern causes Ganon to retaliate by zapping her with lightning. After dodging Ganon's skull-shaped projectiles, Zelda uses the Wand of Gamelon on him. It creates magic chains that wrap around and bind Ganon, then summons a book that traps him inside its pages. Before his imprisonment, Ganon promises Zelda that this isn't the last time she'll see him. Ganon drops a key to Harkinian's prison upon his defeat.
Interestingly, the book that Ganon is trapped inside resembles the Book of Koridai. It's unknown if this was an intentional choice or if it was a simple reuse of animation.
Duke Onkled

Named in: In-game cutscenes
Requests?: Yes - for Zelda to not hurt him
Rewards?: Yes - Key to Reesong Palace
Duke Onkled is a royal hailing from Gamelon and, according to the game's manual, its leader. Upon hearing that both him and his country were under attack by Ganon's forces, King Harkinian sails to Gamelon to aid the Duke. However, Harkinian and Link go missing soon after they arrive, kickstarting the events of The Wand of Gamelon.
When Zelda reaches Dodomai Palace, she is told by Lord Kiro that Duke Onkled betrayed Harkinian and was working with Ganon all along, though it appears she knew of this already. Kiro tells Zelda how to enter Onkled's secret chamber within Dodomai Palace, and she finds the treacherous Duke there. Onkled begs Zelda to not hurt him, and offers to tell her how to find the secret entryway in Ganon's fortress, Reesong Palace. He also gives her a key that opens a gate in the entryway. Afterwards, Lord Kiro apprehends Duke Onkled.
Duke Onkled is seen once more in the game's ending, brought out by Lord Kiro. He begs King Harkinian for mercy, but the King punishes him by having the Duke scrub all of Hyrule's floors. Lord Kiro takes him away.
Ganon's Minions
Gibdo

Named in: In-game cutscenes
Weakness: Shroud
Drops: Nothing
Gibdo is the first boss that Zelda has to fight in the game. He is located within Sakado's church, busy resurrecting its dead and having them enslave the living. After finding a key in the graveyard, Zelda enters the church and sees Gibdo playing on the church's organ. He notices and tells his minions to stop her.
Zelda has to climb up the church's supports in order to reach Gibdo, who can only attack using a slow (yet powerful) lunge. She throws the Shroud at Gibdo, which covers him and turns him into mush.
Iron Knuckle

Named in: In-game cutscenes
Weakness: Power Glove
Drops: Life Heart + Key to Cravendish's cell
This Iron Knuckle resides in Tykogi Tower, and is either the second or third boss that Zelda encounters. He appears to be the one who led the capturing and jailing of Sakado's citizens, given how he owns the key to Mayor Cravendish's cell. After Zelda frees Harbanno from Tykogi Tower, she ascends it and runs into Iron Knuckle.
He threatens Zelda's life due to her resistance, and a fight ensues. He acts much like Gibdo, slowly walking around and attacking with his sword. Once Zelda uses the Power Glove, Iron Knuckle's armor falls apart and shatters, revealing his still-beating Life Heart. Two Armos witness Iron Knuckle's death and make their escape. Afterwards, Zelda gets his Life Heart and the key he was holding.
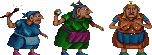
Witches
Named in: CD-Online guide
Weakness: Swords
Drops: Nothing
This trio of witches have taken over The Fairy Pool, and are either the second or third boss that Zelda fights. Their introduction cutscene reveals that they are obsessed with making evil, and do so by freezing the Fountain of Life within the pool (thereby trapping its fairies) and spreading darkness to the surrounding area. Zelda must use her Lantern to light up the darkened pool.
The Witches have fireball attacks that instantly kill Zelda, though this is offset by them being defeated in one sword strike each. The blue (red) witch is located on the platform above where Zelda starts, the green witch is underneath a tree on the right side of the area, and the orange (olive) witch is on a tree branch above the previous witch. Once all three witches have been defeated, the coven is blown away by a gust of wind, upset over their evil being ruined.
Their defeat unfreezes the Fountain of Life and frees the Fairies that live there, though the darkness itself remains.
Wizzrobe

Named in: In-game cutscenes
Weakness: Reflecting Shield
Drops: Key to Lady Alma's prison
Wizzrobe is likely to be the fourth boss Zelda fights, right after dealing with Iron Knuckle and the Witches. He is first seen in a vision Impa shows to Zelda at Shutoy Lake; there, the evil mage captures the fearless Lady Alma by trapping her behind a stone barrier in the lake's tower. He isn't encountered until a room deep within the tower and the level itself.
There, Wizzrobe fires skull-shaped disintegration spells at Zelda which kill her upon impact. She must use the Reflecting Shield from Gobiyan Ship to reflect the spell back at Wizzrobe. After being hit, Wizzrobe bursts into flame and dissipates, leaving behind a key that opens Lady Alma's prison.
Hektan

Named in: In-game cutscenes
Weakness: Swords
Drops: Life Heart
Hektan is located within Dodomai Palace, and is the fifth boss the player will have to defeat. He is a wizard that is one of Ganon's most dangerous minions, and has personally imprisoned Lord Kiro after his attempt to save King Harkinian. Hektan is first seen in one of Impa's visions outside Dodomai Palace, essentially acting as a servant to Ganon. Later, in a Dodomai side-room, Impa shows Zelda how dangerous Hektan as he rapidly teleports and blasts an Armos away. This teleportation ability is never seen outside the cutscene.
Zelda encounters Hektan on Dodomai's rooftop plaza, and he retaliates by throwing Gleeok head-shaped fireballs that kill her instantly. However, a single strike from her sword will kill Hektan, which causes him to melt into a pool of bubbling liquid as well as his still-beating Life Heart. Zelda takes it.
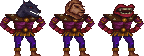
Omfak
Named in: In-game cutscenes
Weakness: Swords
Drops: Wand of Gamelon
Omfak is the last boss Zelda will have to defeat before facing Ganon, as he guards the Wand of Gamelon that Ganon must be defeated with. He is a gluttonous creature that has the ability to change his head into three forms - a wolf's head that attacks with eye lasers, a lion's head that breathes fire, and a pair of giant red lips that eats stuff. Omfak is initially seen in Impa's vision at the Shrine of Gamelon, where he uses his three heads to kill and eat a bird.
Zelda fights Omfak inside the Shrine itself. He attacks with flashes fired from his wolf head, and changes into his lion/lips form depending on if Zelda is on the Shrine's central platform. The player has to strike Omfak in the head while in his lips form; once done, his head explodes and a flock of crows fly out of his body. He leaves behind the Wand of Gamelon.
NPCs
Fairies

Named in: "The Fairy Pool" area name
Requests?: Yes - for Zelda to free them
Rewards?: Yes - Life Heart + Fairy Dust + Water of Life
A duo of fairies live inside The Fairy Pool, to the surprise of nobody. However, the Witches have frozen the Fountain of Life and trapped its fey occupants. By defeating the Witches, Zelda can interact with the fairies on a stone pedestal within the pool. They reward the Princess with a triple threat of items; a Life Heart, followed by a bag of Fairy Dust, and lastly some Water of Life.
Zelda can keep interacting with the fairies for more Water of Life.
Grimbo

Named in: Official TWoG Guide
Requests?: Yes - Hanyu Spore
Rewards?: Yes - Power Glove
Grimbo is an alchemist and a hermit who lives in a hut deep within Washubi Swamp. When Zelda enters his hut, he is skeptical of Zelda's ability to fight Ganon. However, she wins Grimbo over with her courage, and he offers to give her "a bit more punch" if she brings some Hanyu Spore.
Once Zelda returns with the Hanyu Spore, Grimbo takes it and her glove and drops them into a fire. She is alarmed at first, but Grimbo tells her not to worry and, using tongs, takes out a newly-crafted Power Glove. He'll remain in his hut after the glove is obtained.
Harbanno

Named in: Official TWoG Guide
Requests?: Yes - his freedom
Rewards?: Yes - Key to his store (Tykogi Tower), Bread (Sakado)
Harbanno is a baker who works out of a store on Sakado's main street, between Lika's house and the abandoned house with the Power Sword. Before Zelda arrived, he was captured by Ganon's forces (where he cried about how his cakes will burn) and imprisoned within Tykogi Tower. This is shown in Impa's vision at Tykogi Tower, where he's either grabbed off-screen by a foe or ran away before being captured.
Once Zelda enters Tykogi Tower, she meets Harbanno on its ground floor. He tells her that Mayor Cravendish is chained further within the tower, telling her to hurry. Harbanno then runs off to check on his cakes, but not before telling Zelda to visit him and handing her a key to his store.
Zelda can meet up with Harbanno in his store after his escape. He shows Zelda a loaf of his bread and states that Link could "eat ten of [them]", with the Princess correcting him by saying "at least!". Harbanno then says that Arpagos love eating his bread, before handing Zelda a loaf. Zelda can come back for more Bread whenever she runs out.
Lady Alma

Named in: In-game cutscenes
Requests?: Not really?
Rewards?: Yes - Canteen
Lady Alma is a noblewoman that Zelda has to free in Shutoy Lake's tower. She's first seen in a vision in Shutoy Lake, where she bluntly states to Wizzrobe that she's not afraid of him. Angered, Wizzrobe traps her behind a pile of stones and tells her to wait until she IS scared of him. Once Zelda defeats Wizzrobe, she unlocks the room and blows up a stone barrier to free Lady Alma.
When the two meet, Lady Alma states that Link told her about Zelda, and that he traded his canteen for a kiss. Zelda is alarmed, and Lady Alma brushes off her questioning attitude by giving her Link's (empty) Canteen. She then takes her leave.
Lady Alma is seen during the ending cutscene. After King Harkinian punishes Duke Onkled, Zelda loudly wonders where Link went off to. Lady Alma, now holding a mirror, replies by stating that Link was "a bore". Annoyed, Zelda grabs the mirror and chucks it at a wall, smashing it and freeing Link. It's never explained how Link got in the mirror, how Zelda found out, and if Lady Alma knew about this all along.
Lika

Named in: Official TWoG Guide
Requests?: Yes - Fairy Dust
Rewards?: Yes - Cloak, then Magic Cloak
Lika is a creepy-looking, yet ultimately nice woman who lives at the last house on Sakado's main street. When Zelda first talks to her, Lika greets the Princess and has her wait for a moment while she brings out a purple cloak. Lika states that she needs some Fairy Dust to turn her cloth into a Magic Cloak.
Once Zelda returns with some Fairy Dust obtained at The Fairy Pool, Lika gets to work. She dumps the entirety of the Fairy Dust onto the now-Magic Cloak and explains to Zelda how it can make her invisible to enemies. Lika then leaves her house.
Lord Kiro

Named in: Official TWoG Guide (Dutch)
Requests?: Yes - his freedom
Rewards?: Yes - Key to Duke Onkled's chamber
Lord Kiro is a nobleman who was with King Harkinian when they were captured by Ganon's forces. This event is (partially) seen in a vision Impa has at Dodomai Palace - Kiro tries to intervene, but Ganon shuts him down and has Hektan imprison the "runt" in one of Dodomai Palace's towers.
After Hektan dies, Zelda enters the tower where Lord Kiro is and frees him. Kiro explains that Duke Onkled betrayed King Harkinian, something that Zelda somehow knew already. He then tells her that the head of a portrait must be struck to enter Onkled's secret chamber, and gives her the key to the portrait's room. When Zelda finds Duke Onkled and gets the key to Reesong Palace, Lord Kiro apprehends the treacherous Duke.
Lord Kiro is seen in the ending cutscene, bringing out Duke Onkled before the newly-freed King Harkinian. After his sentencing, Duke Onkled is taken away by Kiro.
Lubonga

Named in: Official TWoG Guide
Requests?: No
Rewards?: Yes - Shroud
Lubonga lives in the village of Aru Ainu; her hut requires a key that's obtained by defeating a Dodongo in the village's other hut. When Zelda talks to her, Lubonga says that she's the only resident left after a Gleeok arrived and chased off the other villagers, and that monsters "know better" than bothering her.
She then hands Zelda the shroud she was actively knitting, stating it can "scare the wraps" off Gibdo. Lubonga will remain at her hut after handing Zelda the shroud.
Makoto

Named in: Official TWoG Guide
Requests?: Yes - Arpagos Egg
Rewards?: Yes - Flute
Makoto is the lone inhabitant of Kobitan. Accessing her house requires a key dropped by the Vire in the village's barn. She is starving because all of the invading Moblins in the town have eaten all of the food; because of this, Makoto desperately wants to eat an Arpagos Egg.
Once Zelda brings over an Arpagos Egg from Sakado's "tall house", Makoto cracks it into a frying pan and prepares to turn it into an omelette. She rewards the Princess with a Flute, and then leaves her house.
Mayor Cravendish

Named in: In-game cutscenes
Requests?: Yes - freedom from his chains
Rewards?: Yes - Magic Lantern
Mayor Cravendish is the mayor of Sakado (according to the manual). He, alongside Harbanno, was captured and taken to Tykogi Tower by Ganon's forces. He is first seen in a vision Impa has near Tykogi Tower, where Cravendish protests his capture by stating it is illegal. This complaint falls on deaf ears, and he's taken to a cell on top of the tower that's guarded by Iron Knuckle. Harbanno also mentions Cravendish's capture before escaping.
Zelda unlocks Cravendish's cell by using a key dropped by the now-dead Iron Knuckle. The Mayor is embarrassed by the position he's in, and kindly asks Zelda to cut his chains. She does, and Cravendish falls to the floor faster than his powdered wig. He pulls the wig back on, thanks Zelda, and gives her a Magic Lantern he was able to smuggle into Tykogi Tower. Afterwards, Mayor Cravendish flees the area and isn't seen again.
The "tall house" in Sakado where Zelda gets the Arpagos Egg has a portrait that looks remarkably similar to Mayor Cravendish. It's possible (though not confirmed) that this house is his.
Myra

Named in: Official TWoG Guide
Requests?: Yes - Arpagos Feather
Rewards?: Yes - Magic Cape (Hanyu Forest), Fairy Lantern (Nokani Forest)
Myra is a travelling woman that's seen in both of Gamelon's forests. Initially, Zelda encounters her near the end of Hanyu Forest, where she asks if the Princess has any Arpagos Feathers. If Zelda has the Arpagos Feather from Gobiyan Ship, she hands it over to Myra who then turns the Shroud (or, in the cutscene, her apron) into the Magic Cape before leaving.
Myra is encountered again at the top of a tree within Nokani Forest. She gives Zelda the Fairy Lantern, stating it can penetrate the darkness around Ganon, but also warns her that he can only be defeated with the Wand of Gamelon. Myra wishes Zelda luck before leaving once again.
Sakado Merchant

Named in: TWoG manual
Requests?: No
Rewards?: Kind of - he's a shopkeeper
This unnamed individual is the only shopkeeper in Zelda: The Wand of Gamelon, and can be found in his store in Sakado. He's a rather sketchy individual who's more interested in making money than helping out Zelda during her adventure. If Zelda doesn't have enough Rubies to buy something, the Sakado merchant tells her to kill a few Goriyas instead. (Though, Goriyas are only found in the game's final areas...)
Here are the prices of the Sakado merchant's wares:
| ---- | Lamp Oil x3 | Rope x3 | Bombs x3 |
|---|---|---|---|
| Price | 5 Rubies | 10 Rubies | 20 Rubies |
Sanda

Named in: Official TWoG Guide
Requests?: Yes - freeing Yokan
Rewards?: Yes - Water of Life
Sanda is a water bearer who lives in the lone desert of Gamelon, Ahitaru. She can be found juggling her water jug near a giant fish skeleton. When Zelda speaks to her, Sanda rewards her jump over the nearby Gohma Pit with some Water of Life. However, Sanda notices that Yokan is trapped inside the fish skeleton's head and tells Zelda.
Sanda can be talked to after Yokan is freed, in which case she simply rewards Zelda with Water of Life.
Yokan

Named in: Official TWoG Guide
Requests?: Yes - his freedom (Ahitaru), Heat Crystal (Sakado)
Rewards?: Yes - Magic Sword
Yokan is a fisherman who hails from Ahitaru, much like Sanda. At some point, he went out fishing and ended up trapped inside a giant fish skull, blocked by a huge boulder. His predicament is noticed by Sanda, who tells Zelda after she rewards her with Water of Life. Zelda can use ten Bombs (or the Power Glove) to free Yokan from his predicament. He thanks her and decides to give up fishing, leaving Ahitaru for Sakado.
Using a key he leaves behind, Zelda can enter Sakado's smithy to find Yokan working there. He tells Zelda about his brand-new job - putting on an apron as he does so - then tells her to bring him a Heat Crystal so he can fix up her Power Sword. Once she returns from Dordung Cave with the crystal, Yokan tempers her sword into the Magic Sword and tries its power blasts out before handing it to her. He gets back to work after doing this.
Return to top
Last updated: August 11th, 2025.